Monday, 9 July 2012

Sweet Angel for valentine ในแบบฉบับนางฟ้าแสนซน

How to contest // I wanna be an angel
Sponsor by Benefit

Sweet Angel ในแบบฉบับนางฟ้าแสนซนรับ valentine

It's near Valentine!! The season of Love and compassion. I'm sure many Makeup Artist and Guru will definitely brought out their Valentine's makeup tutorial. Here is mine, a quick sweet and simple look that can easily be done by anyone. It's the mixture of orange and pink colour, with the naturally intense eyelashes (..fake eyelashes) and ligth glowy skin.

Here is before and after photo. Let's take a look!


Let's see how it's done shall we.
Here's overall equipments...


First of all face preperation, always start with clean skin anyour selection of moisturiser.
Here get equip!!


Face

1 Lioele blooming shimmer pearl base
2 Urban decay eyeshadow primer potion
3 M.A.C select cover-up NW35
4 M.A.C select moisturecover NW30
5 Illamasqua light liquid foundation LF215
6 Illamasqua light liquid foundation LF240
7 Ben Nye Luxury powder – Banana
8 Ben Nye Translusent face powder – sienna
9 M.A.C Studio stick foundation – Nw45


1 Apply lioele shimmer pearl base, I often apply this underneath the foundation. This will give the natural glow to your skin. Then I apply Holika bb cream right after, It will give you the smooth and radian finish. Haaa here go the white cast!!

2 here I use two different shade of Illamasqua light liquid foundation. As I am naturally have two tone skin its always best to mix and match it.

3 With this I can now create 3D effect to my face using light and shadow theory to gives the dimension to the face and this will also help framing the face too.

4 concealer time! For under eye I using M.A.C select moisturecover NW30. To conceal the rest I using M.A.C select cover as the texture of the concealer is thicker and it's give a better coverage than moisturecover.

5 I using M.A.C Studio stick foundation for shading to hind those round cheek of mine. x

6 Set the face with any powder you like, here I using Ben Nye Translusent face powder. Using 2 shade of colour following the light and shadow theory.


1 หลังจากเตรียมหน้าใส่เบสlioele ให้ทั่วเบสที่ใช้มีประกายวิ้งๆซึ่งทำให้หน้าโกลวแบบธรรมชาติ แล้วใช้ bb ของ holika ทาให้ทั่ว วอกแล้วนะ
2 ใช้รองพื้นทั้งสองสีของ illamasqua ก็ผสมไปมา
3 เน้นให้ใจกลางของหน้าให้สว่างกว่ารอบนอกเล็กน้อย เพื่อเป็นการ frame หน้าไปในตัว
4 concealer จ๊ะใต้ตาใช้ M.A.C select moisturecover NW30 ส่วนอื่นๆ พวกสิวและรอยแดงใช้ M.A.C select cover-up เนื้อมันหนากว่า
5 ทำเฉดดิ่งด้วยM.A.C Studio stick ทำให้หน้ามีมิติ แก้มกลมๆก็จะเป็นเงา
6 แป้งคะใช้หลักเดียวกันกับรองพื้น กลางหน้าสว่าง รอบนอกให้เข้มกว่าเสร็จแล้วจ๊


Eye
1 Too face – Heaven
2 MAC eyeshadow สีส้มมีวิ้งนิดๆจำชื่อไม่ได้
3 MAC – retrospeck
4 eyeshadow สีอิฐจาก givenchy ไม่มีชื่อ
5 Illamasqua powder eyeshadow – vulgar
6 MUFE – no:2
7 OCC – HUM
8 stila kajal liner – onyx
9 Missha liquid eyeliner
10 rimmel brown pencil – dark brown
11 Illamasqua medium pencil – coax
12 Bobbi Brown long wear liner – black
13 Bobbi Brown long wear liner – sepia ink
14 Mac sheen supreme – Blossom culture
15 DUO lash glue – clear
16 NYX cream blush- rose petal
17 The body shop blush – coral
18 MAC iridescent powder – belightful


1 apply powder eyeshadow shade heaven from Too face underneath the brown.
2 Using MAC shimmering orange eyeshadow on the eyelid.
3 Apply bright orange eyeshadow from illamasqua on the eye crease.
4 Using Givenchy eyeshadow brown brick colour and the tail of the eye.

1 ใช้สีครีมสว่างของ too face ทาใต้คิ้ว
2 ใช่แชโดวของ MAC สีส้มมีวิ้ง ทาบนเปลือกตา
3 ใช้สีvulgar ของ illamasqua ทาตรงร่องพับตา
4 ใช้สีอิฐทาไปตรงหางตาเพื่อสร้างมิติตาจะมีขอบเข้มขึ้นทันที


5 Using the same brown brick colour over the end of the eye, apply it all the way to the bottom of the eye. Only half way will do
6 Apply the same shimmering orange eyeshadow on the top part of the eye lid
7 Using OCC super fine glitery loose colour apply as follow
8 Apply MUFE yellow eyeshadow underneath the eye, and apply slivery retrospeck gliter from MAC at the tear duct help highlighting the eye. Lit them up completely
9 Eyeliner time!! Sweet droopy eyes are super cute
10 Apply mascara of your choice. Here I using Majorica lash expanded frame plus!

5 ใช้สีอิฐทาเน้นย้ำที่หางตาไล่ลงมาใต้ตาครึ่งทาง
6 ใช่แชโดวของ MAC สีส้มมีวิ้ง ทาเน้นไปตรงหัวตาตามภาพ
7 เอา OCC ที่วิ้งสุดๆ ทาไปตามภาพจ๊ะ
8 เอาสีเหลืองทาใต้ตาตามลูกศร แล้วเอา MAC retrospeck แชโดวประกายเงินทาหัวตาตามภาพคะ
9 กรีดตาแบบหางตาตกจะได้ดูหวานๆ
10 ปัดขนตาละนะ

Here come the eyebrown!


Thank you for visiting my blog xxx


Tuesday, 15 May 2012

Imats London 2012

IMATS London
(international makeup artist trade show)

งานนี้มีปีละครั้งเท่านั้นที่ London, New York, LA, Vancuver, Sydney, Toronto
เก๋เอาบรรยากาศในงานมาฝากคะ ไม่ได้ถ่ายรูปเยอะนะคะมั่วแต่ช๊อบจนเหนื่อยเลย เกือบแบกไม่ไหว

 It was totally a thrill that I had a chance to visited IMATS. This year it's place at Alexandre Palace, which easily to get to by train and public transport. It was absolutely freezing cold outside but once you in there is no need for coat. It was totally ramp and the queue was longggg... but it moving fast. here is some picture of the event.... (didn't took much was just there to shop and I was not disappointed)

Do you have to be makeup artist to get in?
No, you don't. I'm not a makeup artist or Guru myself. I'm only a makeup enthusiastic, shopaholic and cosmetic addicted pengy. 

For me, this event is an opportunity which allow me a chance to attended some talk from many talented Professional Makeup artist and a chance to get my fix of shopping!!. 

Many of the cosmetic companies are sold their products at the discount price his special event to encourage more people to come and for those who turn up to spend and also a chance for them to launch their new products. Well those whose there get the bargain, I was not believe how cheap some products are. the discount prices was range between 10% to 70% off. 

I was thrilled with surprise once I arrived at Illamasqua counter. It was full from all directions, It was almost impossible to approached. Here is the list of what I bought and can you believe it?? at these prices!!

3 x Liquid Metal  >>> retail price £17.50 each,  I got it for £5.00 each
4 x medium pencil >>> retail price £13.00  each,  I got it for £2.00 each 
1 x lipstick >>> retail price £15.50  each,  I got it for £5.00 each
1 x powder eye shadow >>> retail price £15.50  each,  I got it for £5.00 each
2 x light liquid foundation  >>> retail price £21.50  each,  I got it for £7.50 each
1 x powdered metal  >>> retail price £22.50  each,  I got it for £7.50 each
1 x Illumine Oil >>> retail price £25.00  each,  I got it for £7.50 each


Makeup forever counter... It was totally pack.. Just no chance im getting in!
อีกเจ้านึงที่เก๋หลงรักมาก แต่ร้านแน่นมากกก เข้าไม่ได้อะ
ไว้รอไปนิวยอกอีก 2 อาทิตค่อยไปสอยละกันนะ
อันนี้เค้าสาทิดการทำ stencil ลวดลายด้วย airbrush คะ สวยมากแต่อุปกรแพงม๊วกกกก


OCC counter!! Here is the famous Lip tar xx Go crazy girl you are allow!
I have bought some for myself too sooo hopefully I get a chance to swatch it for you very soon.
Occ เค้าเปิดตัวสีใหม่มาด้วยคะ

Here is what im taking home with me!!


Friday, 16 March 2012

wet look 1 - Aquamarine

wet look 1 - Aquamarine

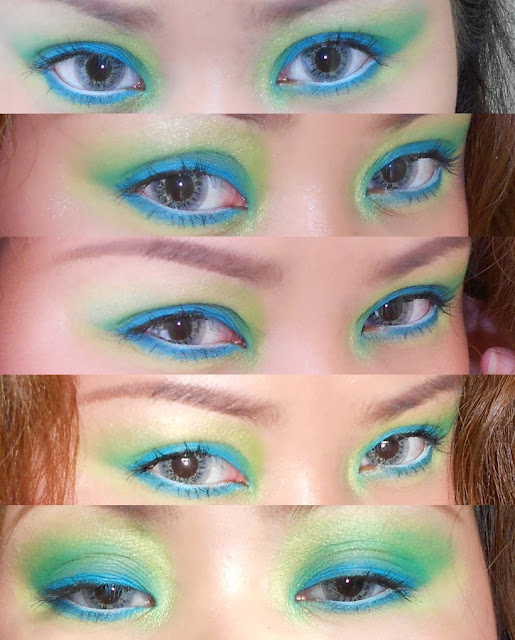
A chillout look inspire by the colour of the sea from my Trip to Miami and Florida Key. I was surrounded by all amezing shade of deep blue sea, beautiful greenery and totally romantic atmosphere. This is also a chance for me to play and experiment with colour.


Let's take a look at before and after photo.


Skin preperation

Here lets start with well prep skin with Moisturiser, I also apply face to change Makeup base from Holika Holika. Move on to tinted moisturiser from Laura Mercier, which will give me the natural dewy skin effect. Then conceal the dark circle, redness and spot with and concealer or corrector of your choice. And we done, now just wait for the moisture of your skin to shine through.


Eyes


Here I'm using 120 colour palette, which is cheap and cheerful.x
1 Using light Lime green blend above the crease.
2 Go over it again, this time with the stronger shade of lime green, and over the lower lash line with yellowy green. It will help brighten up the look.
3 Using dark turquoise green eyeshadow apply as picture shown above, concentrate on the inner and outer lid and slowly blend it across to the middle.
4 Filling the blank on the middle lid with lovely blue colour as shown.


5 Using the same blue colour apply on the outer and inner lower lash line. Then blend the blue on to the outer crease to get this soft shade of colour.
6 Apply blue eye liner. Here I'm using Inglot gel liner-bright blue (this baby is waterproof).
7 Using light cream colour apply under the brown to give this hightlight effect.
8 Applying mascara of your choice.
9 Here I used Majolica lash expanded mascara, only 1 coat. If you wish for more dramatic look I recommend false lash with clear lash line.
10 Apply a sparkling lime green by MAC on to the inner lid and blend out to the brown as shown.


Here is the result, shiny dewy skin. I have not use and conturing this time as I was concentrated on using colour. Here I apply deep  and light pink all over to get those sun burn glow. 


1 lip blam from vaseline
2 Etude house tinted lip kiss 55
3 NYX lip lacquer pot in baby doll


Thank you for visiting my blog and hope you like my experimentation  xxxx

LinkWithin

Related Posts Plugin for WordPress, Blogger...